
Banding is one of the most common print quality issues encountered in direct-to-film (DTF) printing. Even with a highly automated printer like the Epson SureColor G6070, visible lines can occasionally appear in prints, affecting image quality and reducing the professional appearance of finished transfers.
The good news is that Epson designed the SureColor G6070 to make maintenance and troubleshooting simple. With built-in automation, intuitive controls, and easy-to-use adjustment tools, users can quickly identify and resolve most causes of banding before they impact production.
In this blog, we’ll cover what causes banding, how to prevent it, and the three most effective ways to correct it on the Epson SureColor G6070.
Watch the Video Tutorial
Before diving into the details, watch our complete walkthrough:
What Is Banding in DTF Printing?
If you’re familiar with digital printing, you’ve likely heard the term “banding.” Banding occurs when visible horizontal lines appear in a print that were not part of the original artwork.
As the printhead moves across the film, it deposits ink in a series of passes. Think of it like mowing a lawn—each pass should overlap perfectly to create a smooth, uniform appearance. When something disrupts that process, visible bands can appear across the printed image.
Banding can cause:
- Reduced image quality
- Inconsistent color coverage
- Visible lines in gradients and solid colors
- Customer dissatisfaction
- Increased waste from reprints
Fortunately, most banding issues on the Epson G6070 can be resolved quickly.
Method #1: Run a Nozzle Check Before Printing
The most common cause of banding on any inkjet printer is clogged nozzles.
When certain nozzles fail to fire ink properly, gaps appear in the printed image. These missing areas often show up as horizontal bands or streaks throughout the design.
How to Perform a Nozzle Check
- Access the maintenance menu on the printer.
- Select the nozzle check option.
- Print the nozzle test pattern.
- Examine the pattern for missing segments.
If sections of the pattern are incomplete, the printer will prompt you to perform a cleaning cycle.
Continue cleaning until all missing segments are restored.
Why Nozzle Checks Matter
A nozzle check takes only a few seconds but can save significant amounts of:
- DTF film
- Ink
- Production time
- Labor costs
Making nozzle checks part of your daily workflow can dramatically reduce print quality issues.
Check Your Humidity Levels
If you frequently lose nozzles, your print environment may be too dry.
Epson recommends maintaining a humidity level between 40% and 60%. Proper humidity helps keep ink flowing correctly and reduces the likelihood of nozzle clogging.
Low humidity can cause:
- Increased nozzle loss
- More cleaning cycles
- Reduced print consistency
- Higher ink consumption
A simple hygrometer can help monitor your production environment and maintain optimal conditions.
Method #2: Run a Media Feed Adjustment
The second major cause of banding is incorrect media feeding.
Different DTF films vary in thickness, coating, and weight. Because of these differences, the printer may need adjustments to ensure the film advances the correct distance between print passes.
How to Run a Media Feed Adjustment
On the Epson SureColor G6070:
- Select your media type.
- Choose Print Adjustments.
- Select Media Feed Adjustment.
- Choose Manual (Standard).
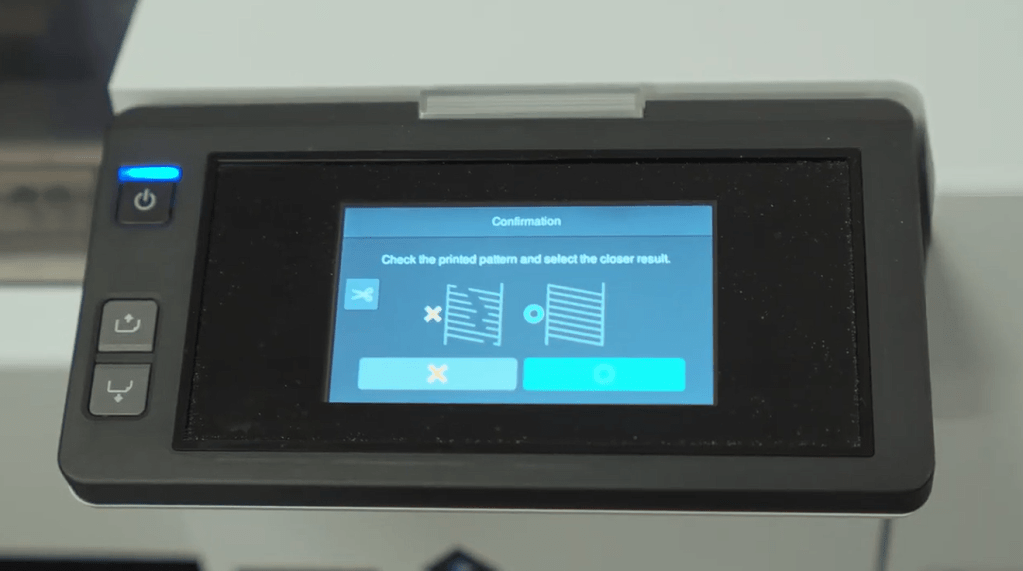
The printer will output a series of test patterns for evaluation.
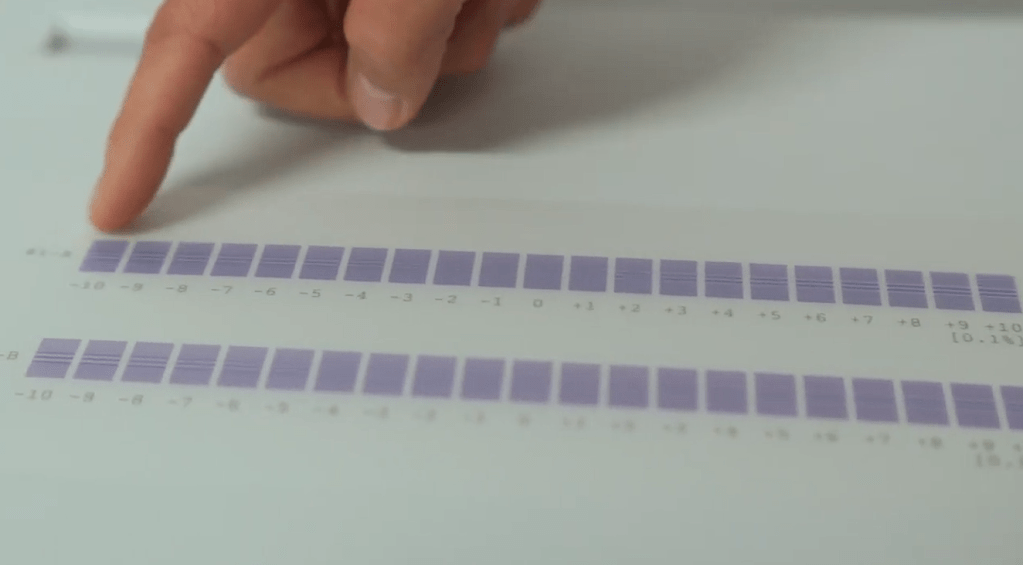
Evaluating the Test Pattern
Your goal is to identify the pattern that produces the smoothest gray box without visible white lines.
Once selected, you’re telling the printer which feed rate delivers the best print quality for that specific film.
When Should You Run a Feed Adjustment?
Always perform a feed adjustment when:
- Installing a new film type
- Creating a new media profile
- Switching manufacturers
- Changing film thicknesses
After the initial setup, feed adjustments generally only need to be repeated if banding begins to appear again.
By properly calibrating media feed settings, you can eliminate many print quality problems before they start.
Method #3: Use the G6070’s Mid-Feed Adjustment Feature
Even after taking preventative measures, occasional banding can occur during long production runs.
Stopping a large print queue to perform a complete feed calibration isn’t always practical.
Fortunately, Epson includes a powerful on-the-fly adjustment feature called Mid-Feed Adjustment.
This allows operators to make corrections while the printer continues producing jobs.
How to Correct Dark Banding
Dark banding occurs when passes overlap too closely.
This causes excess ink to accumulate in certain areas, creating darker horizontal lines.
To correct dark banding:
- Access the Mid-Feed Adjustment menu.
- Press the + button.
- Increase spacing between passes incrementally.
- Continue until the banding disappears.
How to Correct White Banding
White banding occurs when passes are too far apart.
This leaves tiny gaps where ink isn’t being deposited.
To correct white banding:
- Access the Mid-Feed Adjustment menu.
- Press the – button.
- Reduce the feed distance incrementally.
- Evaluate results until the issue is resolved.
Why Mid-Feed Adjustment Is So Valuable
This feature allows operators to:
- Save long production runs
- Reduce wasted film
- Minimize downtime
- Maintain production schedules
- Improve overall print consistency
For high-volume DTF shops, this capability can significantly improve efficiency.
Why the Epson SureColor G6070 Is Ideal for New DTF Users
The Epson SureColor G6070 was designed to make direct-to-film printing accessible to more businesses.
With a price point under $15,000, it provides an affordable entry into professional DTF production while maintaining the reliability and image quality Epson is known for.
Key benefits include:
- Automated maintenance features
- User-friendly touchscreen controls
- Simplified printer setup
- Efficient cleaning routines
- Easy media management
- On-the-fly print adjustments
These features help reduce the learning curve for new operators while providing the tools experienced print professionals need to maintain consistent output.
Best Practices for Preventing Banding on the Epson G6070
To keep your printer operating at peak performance:
Daily Tasks
- Run a nozzle check before production
- Verify humidity levels remain between 40% and 60%
- Inspect film for proper loading
New Media Setup
- Create a unique media profile
- Perform a feed adjustment
- Save optimized settings
During Production
- Monitor print quality regularly
- Use Mid-Feed Adjustment when necessary
- Address banding immediately before it worsens
Following these simple steps can dramatically improve print consistency and reduce waste.
Frequently Asked Questions
1. What is the most common cause of banding on the Epson G6070?
Clogged nozzles are typically the most common cause. Running a nozzle check before production can help identify and correct the issue quickly.
2. How often should I perform a nozzle check?
Many shops perform a nozzle check at the start of every production day or before beginning large print runs.
3. Do I need a feed adjustment for every type of DTF film?
Yes. Different films feed differently, so a feed adjustment should be performed whenever a new film type is introduced.
4. What humidity level does Epson recommend?
Epson recommends maintaining a relative humidity level between 40% and 60% for optimal printer performance.
5. Can banding be fixed without stopping a print job?
Yes. The Epson G6070’s Mid-Feed Adjustment feature allows operators to make feed corrections while a print job is running.
Final Thoughts
The Epson SureColor G6070 makes DTF printing more accessible than ever by combining affordability with user-friendly automation. While banding can occasionally occur, most issues can be resolved quickly through routine nozzle checks, proper media feed calibration, and the printer’s built-in Mid-Feed Adjustment feature.
By incorporating these simple maintenance practices into your workflow, you’ll maximize print quality, reduce waste, and consistently produce crisp, vibrant DTF transfers.
If you’ve tried these troubleshooting steps and still experience banding, it may be time to evaluate your film, environmental conditions, or potential printhead issues. Our team at IT Supplies can help diagnose the problem and get your production back on track!
IT Supplies is your one-stop shop for everything you need to achieve the perfect print. We partner with top manufacturers to bring you the best in printing technology, including Eco-Solvent, Latex, UV, and Aqueous printers from EPSON, HP, and Canon. Our lineup also features a wide selection of Dye-Sublimation, DTF, and DTG printers from EPSON and HP. Explore our full range at www.itsupplies.com or by giving us a call at 1-800-771-9665!
